 I tend to do all my Fantom development in the F4 IDE by Xored so this article guides you through how to use it with the Bed Nap Tutorial application.
If you have not read it already, An Introduction to the F4 IDE provides an excellent overview of the features of F4.
For reference this article was written with F4 Version: 1.1.0.
Create the F4 Project
An F4 project is defined by 3 configuration files in the root of a project directory, along side the build.fan file:
.buildpath.classpath.project
(Yes, all the filenames start with a dot!)
There are 2 ways to create an F4 project and the assocaited config files:
- Use the
New Projectwizard; tick some boxes, select some directories, and F4 will create the config files for you. - Or create and edit the 3 files by hand and use
Import... -> Existing Projects into Workspacewizard.
While the first option sounds easy I find it is fraught with errors, so I favour the later option instead.
The Import Wizard
In the project directory create the following 3 files:
.buildpath
<?xml version="1.0" encoding="UTF-8"?>
<buildpath>
    <buildpathentry kind="src" path="fan"/>
    <buildpathentry kind="con" path="org.eclipse.dltk.launching.INTERPRETER_CONTAINER"/>
</buildpath>
This adds fan/ as a Fantom Source Folder.
.classpath
<?xml version="1.0" encoding="UTF-8"?>
<classpath>
    <classpathentry kind="con" path="com.xored.fanide.jdt.launching.FANJAVA_CONTAINER"/>
    <classpathentry kind="con" path="org.eclipse.jdt.launching.JRE_CONTAINER"/>
    <classpathentry kind="output" path="bin"/>
</classpath>
output specifies where the .pod file will be built to.
.project
<?xml version="1.0" encoding="UTF-8"?>
<projectDescription>
    <name>Bed Nap Tutorial</name>
    <comment></comment>
    <projects>
    </projects>
    <buildSpec>
        <buildCommand>
            <name>org.eclipse.jdt.core.javabuilder</name>
            <arguments>
            </arguments>
        </buildCommand>
        <buildCommand>
            <name>org.eclipse.dltk.core.scriptbuilder</name>
            <arguments>
            </arguments>
        </buildCommand>
    </buildSpec>
    <natures>
        <nature>com.xored.fanide.core.nature</nature>
        <nature>org.eclipse.jdt.core.javanature</nature>
    </natures>
</projectDescription>
Note that each project in F4 needs a unique name, so when adding multiple projects you'll have to update the name element above.
Now go to File -> Import... -> Existing Projects into Workspace. In Select root directory, select where the project files are held. The Bed Nap Tutorial should then appear in the list of Projects:
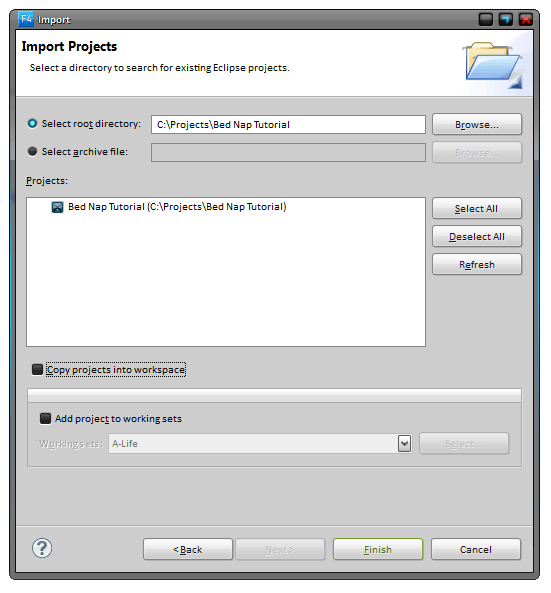
Click Finish and you should have a new Fantom project in F4!
Running Bed Nap
Next we're going to run Bed Nap from F4. We can already run Bed Nap from the cmd line, but if we can run it from F4 then we have the option of Debugging - which can be quite useful.
In F4 it is easier to run a class in your project than it is to run the BedSheet pod passing in parameters. So we'll create a Main class with a main() method:
using afBedSheet

class Main {
    Void main() {
        BedSheetBuilder("bednap").startWisp(8069, true, "dev")
    }
}
This pretty much just mimics what we call from the cmd line.
To run, right click and select Run As -> Fantom class and you should see the standard BedSheet output in the Console View.
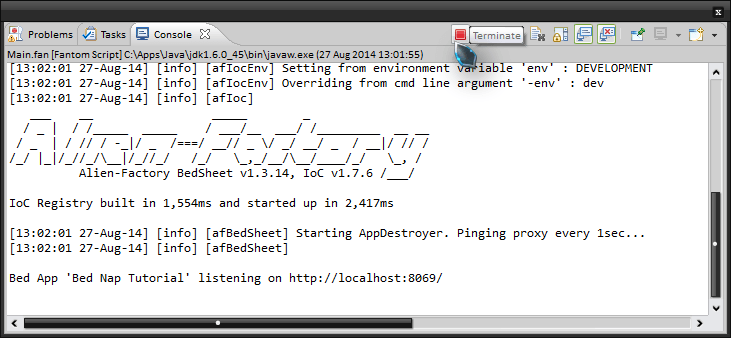
To stop the web app, simply click the Terminate button as shown.
Bed Nap Run Configuration
When you run a class in F4, it creates a Run Configuration. To see and edit the run configurations, click the Run As button in the toolbar, or right click a fantom file and go to Run As -> Run Configurations....
To quickly access and run a recent configuration, click the down chevron next to the Run As button on the toolbar. (It looks like an arrow in a green circle.)
We are going to save the run configuration for Bed Nap as file in the project. This is so if anyone else checks out the project, they too will automatically have Bed Nap listed as favourite in the Run As / Debug As drop down list.
First create an .f4/ directory to save it in. Then edit the run configuration.
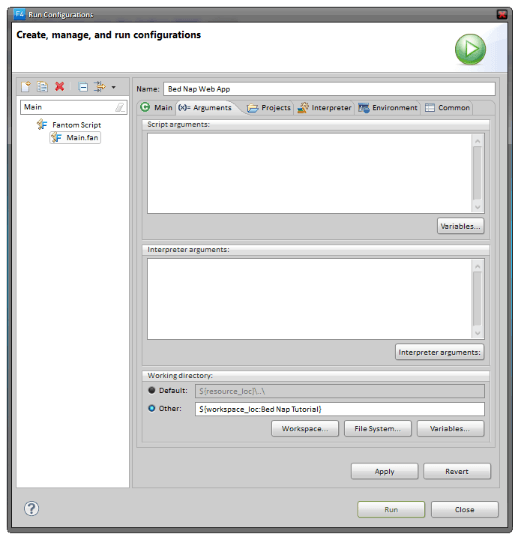
We will change the name from Main to something more recognisable: Bed Nap Web App.
We will also change the default directory it is run from. This becomes very important later on when we introduce templates. Under the Arguments tab, select Working Directory: Other, then Workspace... and Bed Nap Tutorial. This should fill out the textbox with:
${workspace_loc:Bed Nap Tutorial}
Go to the Common tab and click Shared File and Browse... to the newly created f4 directory. This is where the .launch file will be saved.
We'll also add it as a favourite in the Run and Debug menus. When finished, your dialogue should look like this:
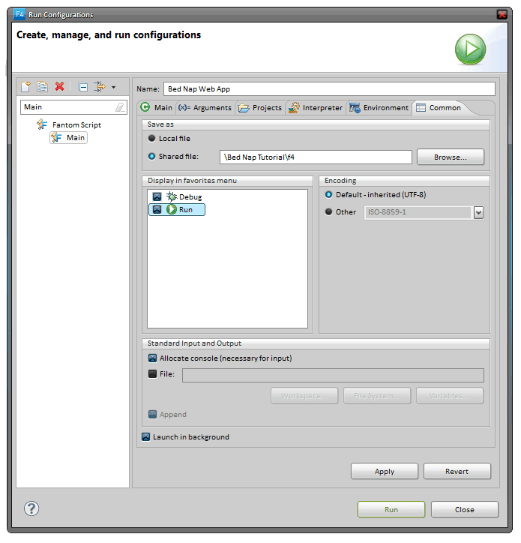
Clicking Apply will save the configuration.
Debugging Bed Nap
Just a note that when it comes to debugging a BedSheet application, make sure the application is run without the development proxy. That is, pass false to the BedSheetBuilder in Main:
BedSheetBuilder("bednap").startWisp(8069, false, "dev")
If you don't then you will be debugging the BedSheet Proxy web app, not the Bed Nap web app. Which isn't very useful!
Source Code
All the source code for this tutorial is available on the Bed Nap Tutorial Bitbucket Repository.
Code for this particular article is available on the 02-Bed-Nap-in-F4 branch.
Use the following commands to check the code out locally:
C:\> hg clone https://bitbucket.org/fantomfactory/bed-nap-tutorial
C:\> cd bed-nap-tutorial
C:\> hg update 02-Bed-Nap-in-F4
Don't forget, you can trial the finished tutorial application at Bed Nap.
Have fun!
Edits
- 5 Dec 2016 - Corrected Debugging Bed Nap section and updated article to reference F4 1.1.
- 2 Aug 2016 - Updated tutorial to use BedSheet 1.5 & IoC 3.0.
- 2 Aug 2015 - Updated tutorial to use BedSheet 1.4.
- 27 Aug 2014 - Original article.